事務所のプリンターは複合機でCanon-MP600を使用しています。以前「はじめての自宅サーバ構築」を参考に、サーバにプリンターを接続して、プリンターサーバとして設定しました。cupsによるプリンターサーバの設定はよく掲載されているのですが、複合機なのでスキャナーもできるようにしたいと思い、スキャナーも設定したので備忘録です。
今回は、リモートデスクトップ(VNC)を使い、Lan上のどの端末からでも遠隔操作でスキャニングできるようにしました。
事前準備
- 「CentOS5.1にVNCサーバインストール」を参考にVNCのセットアップを行います。
- 複合機プリンター(スキャナー)をUSB接続しておきます。
- 複合機プリンター(スキャナー)にスキャニングサンプル用に広告やチラシをセットしておきます。
セットアップ
Canon MP600用スキャナドライバ取得
スキャナドライバーを取得する為こちらへアクセスします。
画面の「MP610 scanner 0.14.0unofficial」ー「mp150-0.14.0u.tar.bz2」をダウンロードします。
サーバへFTP等でアップします。もしくはサーバ上で直接取得します。
wget http://sourceforge.net/projects/mp610linux/files/Sane%20PIXMA%20MPs%20and%20MXs%20scanner/MP610%20scanner%200.14.0unofficial/mp150-0.14.0u.tar.bz2/download
ビルドとインストール
tar -xvof mp150-0.14.0u.tar.bz2
cd mp150-0.14.0u
chmod -R 755 *
make
./install.sh
インストールシェルを起動して、全て[YES]で答えていきます。
[root@moviereader mp150-0.14.1-1u]# ./install.sh

Please connect and turn on your scanner! I will try to detect it.
Please wait until your scanner is ready, then press return...
Connected scanner(s):
1: Canon PIXMA MP600 (SN:xxxxxxxxxxxx)

I'm about to do a test scan. Please put a magazine or photo in the scanner.
The image will be saved in /tmp/pixmascan.pnm, log file in /tmp/pixmascan.log.
Proceed? [YES/no] YES
Executing: ./scan -x 10 -y 15 -w 51 -h 25 -1 -d 10 -W /tmp/pixmascan.pnm 2> /tmp/pixmascan.log
Connected scanner(s):
1: Canon PIXMA MP600 (SN:xxxxxxxxxxxxxxx)
Scan mode: color
DPI:       75x75
Offset:    (32,64) = (1.08cm, 2.17cm)
Dimension: 160x74 = 5.42cm x 2.51cm
Size:      35 kiB (uncompressed, raw)
Source:    Flatbed
Scanning...
100% done (35520 bytes written)
Ok, the driver seems to work with your scanner.
Please check /tmp/pixmascan.pnm if it shows a small picture.

Install the stand-alone program in '/usr/local/bin'? [YES/no] YES
The stand-alone programm was successfully installed at
/usr/local/bin/pixmascan

SANE backend directory: /usr/lib/sane
SANE dll.conf: /etc/sane.d/dll.conf
Installing the SANE backend...
libsane-pixma.so.1 already exists in /usr/lib/sane.
Overwrite? [yes/NO]yes

Basic installation completed.
NOTE: You probably need to set the permission of the device node in
/dev/bus/usb or /proc/bus/usb. See the manual of your OS.
For Linux, see http://www.sane-project.org/README.linux
最後の質問でYESとすると、スキャニングを行います。
Now, I will test the SANE backend. Continue? [YES/no] YES
Executing: scanimage > /tmp/scanimage.pnm 2> /tmp/scanimage.log
Please check /tmp/scanimage.pnm and /tmp/scanimage.log
出力内容のように「/tmp/scanimage.pnm」が作成されています。
出力先と権限を変更
このままでは出力先が「/tmp」になってしまうので、VNCでサーバにログインしxsaneを起動して設定変更を行います。
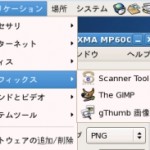
Xsaneは[アプリケーション]-[グラフィックス]-[Scanner Tool]から起動できます。インストールされていない場合はyum等でインストールしてください。

出力先を変更します。Xsaneの[設定]-[セットアップ]-[保存]タブに出力先ディレクトリパスがあるので変更します。
私の場合は出力先をSAMBAフォルダに設定しました。
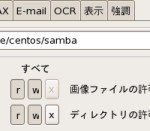
/home/centos/samba/out.png
ローカルPCから取得できるように、出力ファイル権限を設定しておきます。

スキャン実行
VNCのXsane画面から「スキャン」ボタンでスキャニング開始します。保存先がSAMBAなので、ローカルPCからはネットワークフォルダで取得できるようになりました。
おまけ
コマンドからできるようにしてみる
SSHターミナルからリモートで出力できるようにしてみます。
scanimage > /home/centos/samba/out.png
一応出力されますが「.png」でなく「.pmn」形式で出力されます。
Webブラウザから操作「SANE Web Interface」
ブラウザからリモートスキャンできるものです。Mysql、Apache、PHP環境が事前に必要となり、またPHPはImageMagickとPearが必要です。ソースはこちらで配布されています。
[Pear導入手順]
http://jp.layer8.sh/reference/entry/show/id/2402
[PHP環境にImageMagickを導入する手順]
http://mudashinbun.net/?p=13
ソースダウンロード後、解凍しウェブディレクトリ配下におきます。
wget http://sourceforge.net/projects/sanewi2/files/sanewi-1.1-beta/sanewi-1.1-beta.tar.gz/download
tar -xvof sanewi-1.1-beta.tar.gz
mv sanewi-1.1-beta/scanner /var/www/html/.
chmod -R 755 /var/www/html/scanner
導入後は、scanner.cfgを編集します。
以上で、Webから設定できるようになります。